Hi There!
Long break, uh? Well, dear visitors, I have received a lot of emails asking about multiframe DICOM files. This time we will see an approach on how to build such files. A multiframe DICOM file usually has the meaning of a video file. You can open it in a DICOM viewer and then playback its frames.
To achieve such behavior we will need to know how to extract image frames from a MPEG-2 video file. FFMPEG program is a wonderful tool and complete, cross-platform solution to record, convert and stream audio and video. Also you can get Windows versions of FFMPEG here or here. Once your download is done unpack the FFMPEG file to you root directory and type the following command in your command prompt window:
Showing posts with label dcm4che. Show all posts
Showing posts with label dcm4che. Show all posts
Wednesday, February 23, 2011
Wednesday, January 6, 2010
DICOM Multiframe playback using dcm4che 2
Hello visitors,
First of all I'd like to thank you all for every email, tips, comments and mainly the valuable knowledge we have been sharing since I started this simple blog. This time I want to write a tutorial that takes a multiframe DICOM image and then playback it frame by frame. The final result is a Swing Java application where we can watch such file as it was a video file. If you feel it sounds nice so let's go!
If it's your first time here, please I strongly recommend that you read my DICOM to JPEG Conversion post so you can learn how to setup Eclipse and dcm4che toolkit. Then come back to this post and continue to this example tutorial. Let's start! Open your Eclipse IDE and choose
File > New > Java Project. Name it DicomExamples. The next step is to create a new class, so right-click the src package and select New > Class. Enter DicomMultiframePlayer for class name and select the main method option. You'll get something like this:Tuesday, September 1, 2009
CAD-PACS Integration
Hello,
We have published a promising study on the latest Computer Assisted Radiology and Surgery - 24th International Congress and Exhibition in Berlin, Germany. The study presents an open framework that uses dcm4che toolkit for integrating Computer-Aided Diagnosis (CAD) to Picture Archiving and Communication Systems (PACS). It's worth reading! Access AuntMinnie.com for full text and details.
The Brazilian Team (Univesity of São Paulo-USP):
- Paulo Mazzoncini de Azevedo Marques;
- Samuel Covas Salomão;
- Agma Juci Machado Traina;
- Marcelo Ponciano da Silva;
- Alessandra Alaniz Macedo;
- Hugo Cesar Pessotti.
Kindly regards,
Samuel.
We have published a promising study on the latest Computer Assisted Radiology and Surgery - 24th International Congress and Exhibition in Berlin, Germany. The study presents an open framework that uses dcm4che toolkit for integrating Computer-Aided Diagnosis (CAD) to Picture Archiving and Communication Systems (PACS). It's worth reading! Access AuntMinnie.com for full text and details.
The Brazilian Team (Univesity of São Paulo-USP):
- Paulo Mazzoncini de Azevedo Marques;
- Samuel Covas Salomão;
- Agma Juci Machado Traina;
- Marcelo Ponciano da Silva;
- Alessandra Alaniz Macedo;
- Hugo Cesar Pessotti.
| samucs@gmail.com wrote: It's worth reading! |
| Brazilian team marries lung CAD with PACS Nearly all computer-aided detection (CAD) systems in clinical use today have a major shortcoming: the need to transfer image data to a separate workstation to run CAD software, with CAD data remaining separate from the PACS images radiologists read in their normal workflow. Researchers from São Paulo may have the answer. Click here to read more |
Kindly regards,
Samuel.
Thursday, March 26, 2009
SAMUCS Web DICOM Viewer
Hello Visitors,
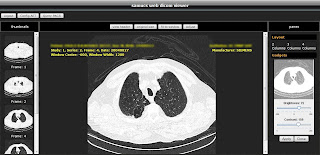
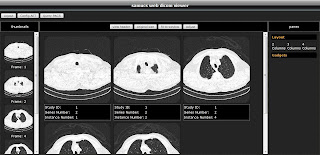
I present you the Samucs Web DICOM Viewer approach. This is a software designed for DICOM image visualization. Since it's a web based program it runs entirely inside your web browser and also makes use of the power of Ajax and Java technologies that increase performance and portability, enhancing flawlessly the user experience.
It's the result of several days of hard work. Here I post the first version of the application for testing and feedback. In addition this software uses the powerful dcm4che toolkit - a collection of open source applications and utilities for the healthcare enterprise. These applications have been also developed in the Java programming, supporting deployment on JDK 1.4 and up.
Features included in this version:
- Remote AE title setup (PACS communication);
- Perform queries on Study, Series and Instance levels;
- Query by filter;
- Query and retrieve images for visualization (C-GET, C-MOVE);
- DICOM header viewer;
- Tools for zooming and image adjustments;
- Different layout views;
To start viewing images right now, first download Samucs Web DICOM Viewer. Then extract the
The Tomcat install is quite intuitive, just follow the instructions and be sure to set port 8080 for Http. In the end you'll be asked to run Tomcat. Then open your web browser and access
That's it! Access
Screenshots:
Enjoy :)
Kindly regards,
Samuel.
I present you the Samucs Web DICOM Viewer approach. This is a software designed for DICOM image visualization. Since it's a web based program it runs entirely inside your web browser and also makes use of the power of Ajax and Java technologies that increase performance and portability, enhancing flawlessly the user experience.
It's the result of several days of hard work. Here I post the first version of the application for testing and feedback. In addition this software uses the powerful dcm4che toolkit - a collection of open source applications and utilities for the healthcare enterprise. These applications have been also developed in the Java programming, supporting deployment on JDK 1.4 and up.
Features included in this version:
- Remote AE title setup (PACS communication);
- Perform queries on Study, Series and Instance levels;
- Query by filter;
- Query and retrieve images for visualization (C-GET, C-MOVE);
- DICOM header viewer;
- Tools for zooming and image adjustments;
- Different layout views;
To start viewing images right now, first download Samucs Web DICOM Viewer. Then extract the
samucs-web.rar to get a WAR file that must be deployed to a Web Server. So download the great Web Server Apache Tomcat. Also, the Java Runtime Environment (JRE) should be running properly on your computer. This application was tested only on Windows Vista environment using Internet Explorer 7 and Firefox 3.0, JRE 6 and Tomcat 6. I strongly recommend Firefox. Linux users I'll try this OS soon :)The Tomcat install is quite intuitive, just follow the instructions and be sure to set port 8080 for Http. In the end you'll be asked to run Tomcat. Then open your web browser and access
http://localhost:8080. If everything is ok you'll see the Tomcat management page. Then click the link Tomcat Manager on the top left corner below the Cat and enter the username and password saved during the installation. Now you are able to deploy the Web application to the server. Scroll down the page until you find the box WAR file to deploy and then select the downloaded WAR file. Finally click the button Deploy. It may be necessary to restart Tomcat before running the application.That's it! Access
http://localhost:8080/samucs-web to begin the new DICOM visualization experience. The default username and password is samucs/samucs. I appreciate your feedback.Screenshots:


Enjoy :)
Kindly regards,
Samuel.
Tuesday, March 17, 2009
Listing DICOM Header information with dcm4che 2
Hi All,
Some readers have asked me questions regarding how to access DICOM header information by DICOM Tag parameters. On this post I present you a quick tutorial on how to list all header information, including the Tag value, VR (value representation), Tag description, and the values of each field using the great dcm4che 2 toolkit.
Like the previous posts, we start coding a simple class with the default constructor. Let's name it
The next step is to code the method responsible for extracting the header info. Note that this method is recursive. This is done because some DICOM files bring encoded Items that may hold other DICOM objects denoted by de value representation SQ. So, we are handling also sequence information with this code. The method is written as follows:
Looking at the code, first we get an iterator to go through our DICOM dataset. Then we code a while loop to get each DICOM element present in the header. At each iteration a new
Then comes the recursive part. We test the VR to see if it's a sequence (SQ), if so then we check if this element has any Items. Then if the answer is true we get the new object and call the
Finally, to test this program we must a
That's it! Now we have a lot of information from our DICOM file header! Enjoy :)
Best regards,
Samuel.
Some readers have asked me questions regarding how to access DICOM header information by DICOM Tag parameters. On this post I present you a quick tutorial on how to list all header information, including the Tag value, VR (value representation), Tag description, and the values of each field using the great dcm4che 2 toolkit.
(0008,0005) [CS] Specific Character Set [ISO_IR 100]
(0008,0008) [CS] Image Type [ORIGINAL]
(0008,0016) [UI] SOP Class UID [1.2.840.10008.5.1.4.1.1.2]
(0008,0020) [DA] Study Date [20040827]
(0008,0021) [DA] Series Date [20040827]
(0008,0022) [DA] Acquisition Date [20040827]
(0008,0023) [DA] Content Date [20040827]
(0008,0030) [TM] Study Time [100357.953000]
(0008,0031) [TM] Series Time [100607.062000]
(0008,0032) [TM] Acquisition Time [100622.688476]
(0008,0033) [TM] Content Time [100622.688476]
(0008,0050) [SH] Accession Number [null]
(0008,0060) [CS] Modality [CT]
(0008,0070) [LO] Manufacturer [SIEMENS]
Like the previous posts, we start coding a simple class with the default constructor. Let's name it
ListDicomHeader.
public class ListDicomHeader {

   public ListDicomHeader() {
      // TODO Auto-generated method stub
   }

   public static void main(String[] args) {
      // TODO Auto-generated method stub
   }
}
The next step is to code the method responsible for extracting the header info. Note that this method is recursive. This is done because some DICOM files bring encoded Items that may hold other DICOM objects denoted by de value representation SQ. So, we are handling also sequence information with this code. The method is written as follows:
public void listHeader(DicomObject object) {
Iteratoriter = object.datasetIterator();
while(iter.hasNext()) {
DicomElement element = iter.next();
int tag = element.tag();
try {
String tagName = object.nameOf(tag);
String tagAddr = TagUtils.toString(tag);
String tagVR = object.vrOf(tag).toString();
if (tagVR.equals("SQ")) {
if (element.hasItems()) {
System.out.println(tagAddr +" ["+ tagVR +"] "+ tagName);
listHeader(element.getDicomObject());
continue;
}
}
String tagValue = object.getString(tag);
System.out.println(tagAddr +" ["+ tagVR +"] "+ tagName +" ["+ tagValue+"]");
} catch (Exception e) {
e.printStackTrace();
}
}
}
Looking at the code, first we get an iterator to go through our DICOM dataset. Then we code a while loop to get each DICOM element present in the header. At each iteration a new
DicomElement is kept so we can access its values. The tag variable holds the current Tag value. From then on there are some useful functions that may help us a lot. We can use the nameOf method from DicomObject class to get the Tag description as a String. I also suggest you to have a look at the TagUtils class for other great functions. The vrOf function will return the value representation to the current element. Then comes the recursive part. We test the VR to see if it's a sequence (SQ), if so then we check if this element has any Items. Then if the answer is true we get the new object and call the
listHeader function again, starting the recursive loop. Each iteration then prints out the desired information.Finally, to test this program we must a
main method for this class. The method may be written as follows:
public static void main(String[] args) {
   DicomObject object = null;
   try {
      DicomInputStream dis = new DicomInputStream(new File("c:/image.dcm"));
      object = dis.readDicomObject();
      dis.close();
   } catch (Exception e) {
      System.out.println(e.getMessage());
      System.exit(0);
   }
   ListDicomHeader list = new ListDicomHeader();
   list.listHeader(object);
}
That's it! Now we have a lot of information from our DICOM file header! Enjoy :)
Best regards,
Samuel.
Tuesday, December 9, 2008
Converting JPEG to DICOM using dcm4che 2
Hi Folks!
At last my small quiz has finished. It was just a few votes (15), however, we’ve got an interesting choice: the Jpeg to Dicom tutorial. So let’s see how we can encapsulate a Jpeg image into a Dicom dataset. This tutorial is based on jpg2dcm utility from dcm4che2 toolkit and you are supposed to know basic java programming, the Eclipse environment, and some Dicom stuff.
Open your Eclipse IDE and choose File > New > Java Project. Name it
I strongly recommend that you have a look at my previous posts for reviewing some configuration steps. Inside the main’s body let’s code the following lines:
The first line creates a new file which is our Jpeg image, and the second one creates our future Dicom file which will keep Jpeg data within. Then, we have to extract some header information from our Jpeg file. To make it easy to understand I decided to use other means than search for Jpeg header markers and hexadecimal numbers. So, let’s do the following:
We open a try block and then read our Jpeg into a BufferedImage through ImageIO.read() method. If this results in an invalid image so we may throw a new exception. Else, we’ve got a valid image and therefore valuable information about it. The BufferedImage class has a lot of useful methods for retrieving image data, then let’s save the number of color components (samples per pixel) of our image, the bits per pixel and the bits allocated:
It’s time to start building our Dicom dataset:
The first line creates a new basic Dicom object defined by dcm4che2 toolkit. The next one puts header information for Specific Character Set: ISO_IR 100 – it’s the same for ISO-8859-1 – the code for Latin alphabet. Finally, the last line puts header information for photometric interpretation (read with or without colors). So if our image has samples per pixel equals to 3, it has colors (YBR_FULL_422), else it’s a grayscale image (MONOCHROME2).
The following lines add integer values to our Dicom header. Note that all of them comes from BufferedImage methods. These values are mandatory when encapsulating. For more information you can check Part 3.5 of Dicom Standard.
Also, our Dicom header needs information about date and time of creation:
Every Dicom file has a unique identifier. Here we’re generating study, series and Sop instances UIDs. You may want to modify these values, but you should to care about their uniqueness.
Our Dicom header is almost done. The following command initiates Dicom metafile information considering JPEGBaseline1 as transfer syntax. This means this file has Jpeg data encapsulated instead common medical image pixel data. The most common Jpeg files use a subset of the Jpeg standard called baseline Jpeg. A baseline Jpeg file contains a single image compressed with the baseline discrete cosine transformation (DCT) and Huffman encoding.
After initiate the header we can open an output stream for saving our Dicom dataset as follows:
The next three lines are the most important ones. According to Dicom Standard the data element PixelData (7FE0,0010), if encapsulated, has the value representation OB (Other Byte String) and its length shall be set to an undefined value (in this case -1). It also contains the encoded pixel data stream fragmented into one or more item(s):
The Item Tag (FFFE,E000) is followed by a 4 byte item length field encoding the explicit number of bytes of the item. The first item in the sequence of items before the encoded pixel data stream shall be a basic item with length equals to zero:
The next Item then keeps the length of our Jpeg file.
Now all we have to do is to fill this item with bytes taken from our Jpeg file:
Finally, the Dicom Standard tells that we have to put a last Tag: a Sequence Delimiter Item (FFFE,E0DD) with length equals to zero.
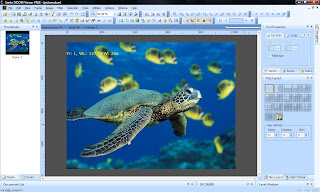
That’s it! Now we have a Dicom file with Jpeg data encapsulated. The print screen below was taken from Sante Free Dicom Viwer and shows a Windows Vista sample Jpeg picture encapsulated into a Dicom file.
References:
Dicom Standard Part 3.5 - Annex A (Normative) Transfer Syntax Specifications - A4 Transfer Syntaxes for Encapsulation of Encoded Pixel Data.
Jpeg Huffman Coding Tutorial
I hope it helps!
Regards,
Samuel.
At last my small quiz has finished. It was just a few votes (15), however, we’ve got an interesting choice: the Jpeg to Dicom tutorial. So let’s see how we can encapsulate a Jpeg image into a Dicom dataset. This tutorial is based on jpg2dcm utility from dcm4che2 toolkit and you are supposed to know basic java programming, the Eclipse environment, and some Dicom stuff.
Open your Eclipse IDE and choose File > New > Java Project. Name it
myJpegToDicom. Next we have to create a new class, so right-click the src package and select New > Class. Enter JpegToDicom for class name and select the main method option. You'll get something like this:
public class JpegToDicom {
   public static void main(String[] args) {
      // TODO Auto-generated method stub
   }
}
I strongly recommend that you have a look at my previous posts for reviewing some configuration steps. Inside the main’s body let’s code the following lines:
File jpgSource = new File("c:/picture.jpg");
File dcmDestination = new File("c:/picture.dcm");
The first line creates a new file which is our Jpeg image, and the second one creates our future Dicom file which will keep Jpeg data within. Then, we have to extract some header information from our Jpeg file. To make it easy to understand I decided to use other means than search for Jpeg header markers and hexadecimal numbers. So, let’s do the following:
try {
   BufferedImage jpegImage = ImageIO.read(jpgSource);
   if (jpegImage == null)
      throw new Exception("Invalid file.");
We open a try block and then read our Jpeg into a BufferedImage through ImageIO.read() method. If this results in an invalid image so we may throw a new exception. Else, we’ve got a valid image and therefore valuable information about it. The BufferedImage class has a lot of useful methods for retrieving image data, then let’s save the number of color components (samples per pixel) of our image, the bits per pixel and the bits allocated:
   int colorComponents = jpegImage.getColorModel().getNumColorComponents();
   int bitsPerPixel = jpegImage.getColorModel().getPixelSize();
   int bitsAllocated = (bitsPerPixel / colorComponents);
   int samplesPerPixel = colorComponents;
It’s time to start building our Dicom dataset:
   DicomObject dicom = new BasicDicomObject();
   dicom.putString(Tag.SpecificCharacterSet, VR.CS, "ISO_IR 100");
   dicom.putString(Tag.PhotometricInterpretation, VR.CS, samplesPerPixel == 3 ? "YBR_FULL_422" : "MONOCHROME2");
The first line creates a new basic Dicom object defined by dcm4che2 toolkit. The next one puts header information for Specific Character Set: ISO_IR 100 – it’s the same for ISO-8859-1 – the code for Latin alphabet. Finally, the last line puts header information for photometric interpretation (read with or without colors). So if our image has samples per pixel equals to 3, it has colors (YBR_FULL_422), else it’s a grayscale image (MONOCHROME2).
The following lines add integer values to our Dicom header. Note that all of them comes from BufferedImage methods. These values are mandatory when encapsulating. For more information you can check Part 3.5 of Dicom Standard.
   dicom.putInt(Tag.SamplesPerPixel, VR.US, samplesPerPixel);
   dicom.putInt(Tag.Rows, VR.US, jpegImage.getHeight());
   dicom.putInt(Tag.Columns, VR.US, jpegImage.getWidth());
   dicom.putInt(Tag.BitsAllocated, VR.US, bitsAllocated);
   dicom.putInt(Tag.BitsStored, VR.US, bitsAllocated);
   dicom.putInt(Tag.HighBit, VR.US, bitsAllocated-1);
   dicom.putInt(Tag.PixelRepresentation, VR.US, 0);
Also, our Dicom header needs information about date and time of creation:
   dicom.putDate(Tag.InstanceCreationDate, VR.DA, new Date());
   dicom.putDate(Tag.InstanceCreationTime, VR.TM, new Date());
Every Dicom file has a unique identifier. Here we’re generating study, series and Sop instances UIDs. You may want to modify these values, but you should to care about their uniqueness.
   dicom.putString(Tag.StudyInstanceUID, VR.UI, UIDUtils.createUID());
   dicom.putString(Tag.SeriesInstanceUID, VR.UI, UIDUtils.createUID());
   dicom.putString(Tag.SOPInstanceUID, VR.UI, UIDUtils.createUID());
Our Dicom header is almost done. The following command initiates Dicom metafile information considering JPEGBaseline1 as transfer syntax. This means this file has Jpeg data encapsulated instead common medical image pixel data. The most common Jpeg files use a subset of the Jpeg standard called baseline Jpeg. A baseline Jpeg file contains a single image compressed with the baseline discrete cosine transformation (DCT) and Huffman encoding.
dicom.initFileMetaInformation(UID.JPEGBaseline1);
After initiate the header we can open an output stream for saving our Dicom dataset as follows:
   FileOutputStream fos = new FileOutputStream(dcmDestination);
   BufferedOutputStream bos = new BufferedOutputStream(fos);
   DicomOutputStream dos = new DicomOutputStream(bos);
   dos.writeDicomFile(dicom);
The next three lines are the most important ones. According to Dicom Standard the data element PixelData (7FE0,0010), if encapsulated, has the value representation OB (Other Byte String) and its length shall be set to an undefined value (in this case -1). It also contains the encoded pixel data stream fragmented into one or more item(s):
dos.writeHeader(Tag.PixelData, VR.OB, -1);
The Item Tag (FFFE,E000) is followed by a 4 byte item length field encoding the explicit number of bytes of the item. The first item in the sequence of items before the encoded pixel data stream shall be a basic item with length equals to zero:
dos.writeHeader(Tag.Item, null, 0);
The next Item then keeps the length of our Jpeg file.
   /*
   According to Gunter from dcm4che team we have to take care that
   the pixel data fragment length containing the JPEG stream has
   an even length.
   */
   int jpgLen = (int) jpgSource.length();
   dos.writeHeader(Tag.Item, null, (jpgLen+1)&~1);
Now all we have to do is to fill this item with bytes taken from our Jpeg file:
   FileInputStream fis = new FileInputStream(jpgSource);
   BufferedInputStream bis = new BufferedInputStream(fis);
   DataInputStream dis = new DataInputStream(bis);

   byte[] buffer = new byte[65536];
   int b;
   while ((b = dis.read(buffer)) > 0) {
      dos.write(buffer, 0, b);
   }
Finally, the Dicom Standard tells that we have to put a last Tag: a Sequence Delimiter Item (FFFE,E0DD) with length equals to zero.
   /*
   According to Gunter from dcm4che team we have to take care that
   the pixel data fragment length containing the JPEG stream has
   an even length. So if needed the line below pads JPEG stream with
   odd length with 0 byte.
   */
   if ((jpgLen&1) != 0) dos.write(0);
   dos.writeHeader(Tag.SequenceDelimitationItem, null, 0);
   dos.close();
} catch(Exception e) {
   System.out.println("ERROR: "+ e.getMessage());
}
That’s it! Now we have a Dicom file with Jpeg data encapsulated. The print screen below was taken from Sante Free Dicom Viwer and shows a Windows Vista sample Jpeg picture encapsulated into a Dicom file.

References:
Dicom Standard Part 3.5 - Annex A (Normative) Transfer Syntax Specifications - A4 Transfer Syntaxes for Encapsulation of Encoded Pixel Data.
Jpeg Huffman Coding Tutorial
I hope it helps!
Regards,
Samuel.
Subscribe to:
Posts (Atom)